RPC over RabbitMQ
In this post I would like to address a question that I see often in the RabbitMQ mailing list and IRC channel. How to reply to a client request with RabbitMQ? I think this question can be quite tricky for new users when we are not familiar with AMQP. The big deal here is to know about the options that we can use to call exchange.declare and queue.declare. So let’s see how to implement RPC using RabbitMQ and AMQP.
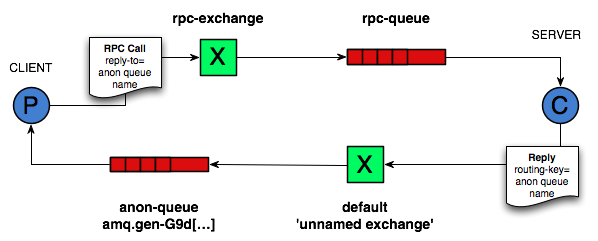
For our purposes we need a server that will get the job requests from a queue. That queue must be bound to an exchange where our client will send the job requests. So far, this is what we are used to do with RabbitMQ. Then we need a reply queue. A place where the responses from the server will go so they can reach our client. Since we can have many clients sending requests to the server, we can’t know in advance the name of those queues, so we will let RabbitMQ assign those names. We also want that once the client is disconnected the queue is removed to keep the server status clean –we don’t want to end with thousands of idle queues in the server–. To achieve this we can declare an anonymous queue as we did in the previous blog post. We need to get the queue name that RabbitMQ assigned to our client and then see how to tell the server that we want the replies into that queue.
This seems like a lot of work… Well, not really if we use the power of AMQP.
According to the AMQP spec there’s a direct exchange with no public name to which every queue must be bound by default using the queue name as routing key. Our server has to use this exchange to reply to its clients, publishing the messages with said routing key. The next piece in our puzzle is the reply-to property from AMQP messages. When our client publishes a request, it will send the queue name via the reply-to property. Once the request is published it will wait and listen into its own anonymous queue. Once the RPC server gets the reply ready, it will send it to the exchange and it will finally arrive to our client. Easy…
Here’s an image to further illustrate the point:
So, let’s see the code now, which is written in Haskell as in the previous post. In this case we will have a server that will hold a Map of users to their surnames. We will query the server for the users surnames, so our request will be the user name that we will input as a parameter when we invoke our client.
Here’s the Code for the client:
--RpcClient.hs

import qualified Data.ByteString.Lazy.Char8 as BL
import          System.Environment

import Network.AMQP

main = do
    (name:_) <- getArgs

    conn <- openConnection "127.0.0.1" "/" "guest" "guest"
    chan <- openChannel conn

    (replyToQ, _, _) <- declareQueue chan anonQueue

    declareExchange chan newExchange {exchangeName = "rpc-exchange", exchangeType = "direct"}

    publishMsg chan "rpc-exchange" "" (msg replyToQ name)
    consumeMsgs chan replyToQ Ack rpcCallback

    getLine -- wait for keypress

    closeConnection conn
    putStrLn "connection closed"

  where
    msg rk name = (newMsg { msgBody = (BL.pack $ name)
                  , msgReplyTo = Just rk })

anonQueue :: QueueOpts
anonQueue = QueueOpts "" False False True True

rpcCallback :: (Message, Envelope) -> IO ()
rpcCallback (msg, env) = do
    putStrLn $ "User Surname is: " ++ (BL.unpack $ msgBody msg)
    ackEnv env
As we did in the previous blog post, first we declare an anonymous queue. The server will assign it a random name which we will use later as the replyTo property of our message, which we pass to the RPC server when we create the msg in the where part. Then the code is nearly the same as in the previous example, where we declare a callback for our consumer.
Next is the code for the RPC server:
--RpcServer.hs

import qualified Data.ByteString.Lazy.Char8 as BL
import Data.Maybe (fromJust)
import Data.Map as M

import Network.AMQP

main = do
    conn      <- openConnection "127.0.0.1" "/" "guest" "guest"
    chan      <- openChannel conn
    replyChan <- openChannel conn

    --declare queues, exchanges and bindings
    declareQueue chan newQueue {queueName = "rpc-queue"}

    declareExchange chan newExchange {exchangeName = "rpc-exchange", exchangeType = "direct"}
    bindQueue chan "rpc-queue" "rpc-exchange" ""

    putStrLn "Running RPC Server"
    putStrLn "Press any key to close"

    --subscribe to the queues
    consumeMsgs chan "rpc-queue" Ack (rpcServer replyChan)

    getLine -- wait for keypress
    closeConnection conn
    putStrLn "connection closed"

rpcServer :: Channel -> (Message, Envelope) -> IO ()
rpcServer chan (msg, env) = do
  publishMsg chan "" routingKey reply
  ackEnv env

  where
		-- extract routing key
    routingKey = fromJust $ msgReplyTo msg
		-- build reply
    reply  = (newMsg {msgBody = (BL.pack (findSurname name))})
		--extract user name
    name = BL.unpack $ msgBody msg
		-- fake users database
    users = M.fromList([("Some","Guy"), ("Another","Dude"), ("John","Doe")])
		-- lookup user surname in the Map
    findSurname name =
      case M.lookup name users of
        Just v  -> v
        Nothing -> "None"
First we setup the exchange and queue that we will use to receive requests. Then on the rpcServer callback we consume messages extracting from them the request and the replyTo property. We create a fake database to keep track of a couple of users and their surnames and we do a lookup based on the provided user name. Our callback will take care of sending the reply back to the client via RabbitMQ. You can see that the message is published to an exchange with no name using the queue name as the routing key, as we explained before.
Let’s try this in the command line, first start the server and then on type the following on a Terminal window.
$ runghc RpcServer.hs
Running RPC Server
Press any key to close
Once the RPC server has started, fire up the consumer passing as parameter one of the names that we have in the database:
runghc RpcClient.hs John
User Surname is: Doe
And that’s it!
I know this example is pretty simple, but I think is enough to illustrate how easy is to implement several kinds of messaging patterns using RabbitMQ and AMQP.